
BLOG
Getting Started with Bruno: Moving Your API Client from Postman to Bruno
- Mission
- What Is Bruno
- About the Bru Language
- 1. Blocks
- 2. Tags
- Built-in Libraries
- Hands-On: Let's Get Started
- How to Test with Bruno
- How to Install Bruno (Desktop App and CLI)
- GUI vs. CLI: When to Use Which
- Setting Up Environment Variables and baseUrl
- Collection File Formats (Bru and YAML)
- Team Sharing and Operations with Git
An innovation in API client technology.

bruno client logo
Say goodbye to bloatware and embrace simplicity, efficiency, and freedom.
Tired of Postman's heavy software? Join the open-source revolution! ✊
Mission
-
Say goodbye to proprietary, clunky interfaces 👎 and welcome to a smart open-source world for API developers 👍
-
Keep your API collections right alongside your code (no more ugly JSON blobs!) 💻
-
Version control everything with ease. No bloated workspaces! 🎮
-
Clone the repo, fire up Bruno, and start working with your APIs right away 🤾
-
No more worrying about lost collections! ✨
What Is Bruno
Bruno is an innovation in API client technology that says goodbye to the "I can't find Tim's collection" problem: "no more messy handoffs." With Bruno, your API client files live in the same directory as your project, so everyone is always on the same page. It puts simplicity, efficiency, and freedom first, for developers.
That description may be a little hard to follow, so let me put it more simply. Suppose company ABC develops APIs for project XYZ using an API client such as Postman, Insomnia, or Hoppscotch. Once project XYZ is complete and the developer in charge has already left the company, the following problems arise:
-
What if the developer never wrote any documentation?
-
What if the developer never saved the API client (Postman, Insomnia, Hoppscotch) collection?
-
What if, for some reason, you cannot access the Postman, Insomnia, or Hoppscotch cloud?
Now imagine the developer builds the APIs and saves the API client collection in the same repository where the code lives. That is exactly what Bruno offers. It is a new way of testing APIs and managing projects with a version control system. Isn't that great?
Bruno has its own DSL (domain-specific language). The idea of learning a new language may feel daunting, but don't worry: it is actually easier to pick up than JSON or YAML. If you are curious why the developers chose to create a new language, take a look at the discussion below:
Why a domain-specific language?
About the Bru Language
First, let's get to know Bruno's language, Bru. Its syntax is similar to the Groovy language. It consists mainly of blocks and tags.
1. Blocks
A Bru file is made up of the following three types of blocks:
-
Dictionary block: a set of key-value pairs.
-
Text block: consists of multiple lines of text.
-
Array block: a list of strings.
1. Dictionary block
get { url: <https://api.textlocal.in/send> } headers { content-type: application/json Authorization: Bearer 123 ~transaction-id: {{transactionId}} }
You can disable a key in a dictionary block by prefixing it with ~.
2. Text block
A text block consists of multiple lines of text.
tests { expect(res.status).to.equal(200); }
3. Array block
vars:secret [ access_key, access_secret, ~transactionId ]
For details, see: Language Design
2. Tags
Bru has a feature called tags, which carry a specific meaning for Bruno. The main tags include the following:
1. meta: Stores metadata about the request.
meta { name: Get users, type: http seq: 1 }
type: can be either http or graphql. seq: is used to store the sequence number. This decides the sort position of your request in the UI. [which request should run first.]
2. get: Executes a GET HTTP request.
get { url: <https://api.github.com/users/usebruno> }
3. post: Executes a POST HTTP request.
post { url: <https://api.github.com/users/usebruno> }
4. put: Executes a PUT HTTP request.
put { url: <https://api.github.com/users/usebruno> }
5. delete: Executes a DELETE HTTP request.
delete { url: <https://api.github.com/users/usebruno> }
For details, see: Bru Tag Reference
For syntax highlighting of the Bru language, see Syntax Highlighting Support.
Also take a look at Secrets Management, Scripting, and Testing.
You can use JavaScript in scripting and testing. Bru comes with built-in libraries, and you can also install external JavaScript libraries as needed. Detailed examples are available in the official documentation.
Built-in Libraries
The following built-in libraries can be imported in your scripts:
-
ajv— Ajv JSON schema validator
-
axios— Promise-based HTTP client for the browser and Node.js
-
node-fetch— A lightweight Fetch API module for Node.js
-
atob— Converts Base64-encoded ASCII data to binary
-
btoa— Converts binary data to Base64-encoded ASCII
-
chai— BDD/TDD assertion library for Node.js and the browser
-
lodash— A modern JavaScript utility library delivering modularity, performance, and extras
-
moment— Parse, validate, manipulate, and display dates and times in JavaScript
-
uuid— For generating RFC4122 UUIDs
-
nanoid— A tiny, secure, URL-friendly, unique string ID generator for JavaScript
-
crypto-js— JavaScript library of crypto standards
Example usage:
const { nanoid } = require("nanoid"); req.setHeader("transaction-id", nanoid());
External libraries
To use an external library, install it with npm and then use it in your scripts and tests.
Example: npm i @faker-js/faker
const { faker } = require('@faker-js/faker'); const randomName = faker.name.fullName(); const randomEmail = faker.internet.email(); req.setBody({ name: randomName, email: randomEmail });
JavaScript top-level await is available in scripts and tests.
I strongly recommend reading the JavaScript API Reference and Response Query as well. Bruno uses chai for its tests.
Key benefits of testing:
-
Greater efficiency: Tests can be run repeatedly, reducing the time and effort that manual testing requires.
-
Better coverage: Automated tests can cover more scenarios and edge cases than manual testing.
-
CI/CD (continuous integration/continuous delivery): Building API tests into your CI/CD pipeline ensures that API changes are thoroughly tested before deployment.
-
Easier maintenance: Automated tests are easy to update as the API evolves, which lightens the maintenance burden compared with manual testing.
-
Simpler regression testing: After changing the API, you can easily re-run the automated tests, reducing the time needed for regression testing.
Example:
test("should be able to login", function() { const data = res.getBody(); expect(res.getStatus()).to.equal(200); }); test("should receive the token", function() { const data = res.getBody(); expect(data.token).to.be.a('string'); });
The official documentation contains many examples and is compact overall. You can read through all of it in about 15 to 20 minutes. I encourage you to read the entire documentation carefully.
Hands-On: Let's Get Started
Enough theory. Let's get hands-on 😁
To start using Bruno, you first need to install Node.js on your machine. I use Volta to manage Node.js versions, but feel free to use whichever tool you prefer.
After installing Node.js, install Bruno:
npm install -g @usebruno/cli
Move to a project where a REST API is implemented.
Here, we will use json-server for the REST API.
Create the project:
-
Create a folder: mkdir api_test
-
Move into the folder: cd api_test
-
Initialize the project: npm init -y
Add bruno.json so that Bruno recognizes the api_test folder as a collection.
Note: here, api_test serves as both the project and the Bruno collection.
-
Create the bruno.json file: touch bruno.json
-
Add the following content to bruno.json:
{ "version": "1", "name": "example rest api test", "type": "collection" }
For fast REST API development, we will use json-server.
-
Install json-server: npm install -g json-server
-
Create an employeeDB.json file and add the following content: touch employeeDB.json
{ "employees": [ { "id": 1, "name": "Yamada", "salary": "10000" }, { "id": 2, "name": "Suzuki", "salary": "8000" } ] }
- Create routes.json and add the following content: touch routes.json
{ "/employees/list": "/employees", "/employees/get/:id": "/employees/:id", "/employees/create": "/employees", "/employees/update/:id": "/employees/:id", "/employees/delete/:id": "/employees/:id" }
The routes.json file above aliases the default routes to custom routes. Aliasing routes departs from the standard endpoint naming conventions of REST architecture, but it is useful for learning purposes.
-
Start json-server: json-server --port 8000 --routes routes.json --watch employeeDB.json
-
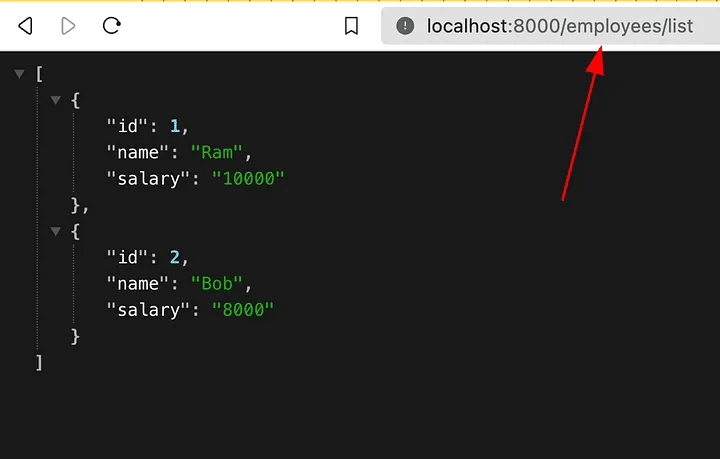
Open the following URL: http://localhost:8000/employees/list
Accessing /employees/list
How to Test with Bruno
-
Create the employee_bruno folder: mkdir employee_bruno
-
Add the following content to list_employee.bru to fetch the list of employees and test that the status is 200 and that the result length is 2. touch employee_bruno/list_employee.bru
-
Then run bru: bru run employee_bruno
meta { name: List Employee type: http seq: 1 } get { url: <http://localhost:8000/employees/list> } headers { content-type: application/json } script:pre-request { console.log("Before the api hit!!!"); console.log("We can get the token or anything which require for the api"); } script:post-response { console.log(res.getBody()) console.log("After the api hit!!!"); console.log("We can set the token or anything which require for the api"); } tests { test("should have response status 200", function() { expect(res.getStatus()).to.equal(200); }); test("should have employees length 2", function() { const data = res.getBody(); expect(data.length).to.equal(2); }); }
- Add the following content to get_employee.bru to fetch an employee by ID and test that the status is 200. touch employee_bruno/get_employee.bru
meta { name: Get Employee type: http seq: 2 } get { url: <http://localhost:8000/employees/get/1> } script:post-response { console.log(res.getBody()) } tests { test("should have response status 200", function() { expect(res.getStatus()).to.equal(200); }); }
- Add the following content to create_employee.bru to create an employee and test that the status is 201 and that the created employee's ID is 3. touch employee_bruno/create_employee.bru
meta { name: Create Employee type: http seq: 3 } post { url: <http://localhost:8000/employees/create> } headers { content-type: application/json } body { { "id": 3, "name": "Marry", "salary": 20000 } } script:post-response { console.log(res.getBody()) } tests { test("should have response status 201", function() { expect(res.getStatus()).to.equal(201); }); test("should have employee id 3", function() { const data = res.getBody(); expect(data.id).to.equal(3); }); }
- Add the following content to update_employee.bru to update the employee and test that the status is 200 and the employee name is Max. touch employee_bruno/update_employee.bru
meta { name: Update Employee type: http seq: 4 } put { url: <http://localhost:8000/employees/update/3> } headers { content-type: application/json } body { { "id": 3, "name": "Max", "salary": 20000 } } script:post-response { console.log(res.getBody()) } tests { test("should have response status 200", function() { expect(res.getStatus()).to.equal(200); }); test("should have employee name Max", function() { const data = res.getBody(); expect(data.name).to.equal("Max"); }); }
- Add the following content to delete_employee.bru to delete an employee by ID and test that the status is 200. touch employee_bruno/delete_employee.bru
meta { name: Delete Employee type: http seq: 5 } delete { url: <http://localhost:8000/employees/delete/1> } script:post-response { console.log("DELETED!!!"); } tests { test("should have response status 200", function() { expect(res.getStatus()).to.equal(200); }); }
The tests above are fine, but what we really want is to:
-
First create an employee,
-
Confirm that there are three employees in the list,
-
And finally, dynamically delete the employee we created.
We don't want to use hardcoded values like the ones above. The domain name is hardcoded as well, so we can add it as a variable.
Let's take a closer look:
-
Create a new directory, employee_bruno_better: mkdir employee_bruno_better
-
Create the environments directory: mkdir environments
-
Inside the folder, create an Employee.bru file and add the following: touch environments/Employee.bru
vars { baseUrl: <http://localhost:8000> }
- Since we create the employee first, we add seq: 1. We also pass --env when running bru so that it picks up the value of baseUrl:
bru run employee_bruno_better --env Employee
Add the following to create_employee.bru inside employee_bruno_better
meta { name: Create Employee type: http seq: 1 } post { url: {{baseUrl}}/employees/create } headers { content-type: application/json } body { { "id": 3, "name": "Marry", "salary": 20000 } } script:post-response { bru.setVar("id", res.getBody().id); bru.setVar("createdEmployee", res.getBody()); } tests { test("should have response status 201", function() { expect(res.getStatus()).to.equal(201); }); test("should have employee id 3", function() { const data = res.getBody(); expect(data.id).to.equal(3); }); }
-
That is simple enough, but let's use the external library faker to fill in the name field:
-
Install the faker library: npm i @faker-js/faker
meta { name: Create Employee type: http seq: 1 } post { url: {{baseUrl}}/employees/create } headers { content-type: application/json } script:pre-request { const { faker } = require('@faker-js/faker'); const randomName = faker.name.fullName(); req.setBody({ "id": 3, "name": randomName, "salary": 20000 }) } script:post-response { bru.setVar("id", res.getBody().id); bru.setVar("createdEmployee", res.getBody()); } tests { test("should have response status 201", function() { expect(res.getStatus()).to.equal(201); }); test("should have employee id 3", function() { const data = res.getBody(); expect(data.id).to.equal(3); }); }
- Similarly, to fetch the employee with ID 3, you can add the following to get_employee.bru. Note: id is set in the bru file above.
meta { name: Get Employee type: http seq: 3 } get { url: {{baseUrl}}/employees/get/{{id}} } script:pre-request { const e = bru.getVar("createdEmployee"); console.log(typeof(e), e) } script:post-response { console.log("RES::", res.getBody()) } tests { test("should have response status 200", function() { expect(res.getStatus()).to.equal(200); }); }
You can now push the files to your repository. For variables, you can also use OS environment variables or a .env file. Refer to the documentation on DotEnv files and secret variables so that you do not push credentials to your Git repository. For the complete example, see the GitHub repository.
You can also use the Bruno GUI application to open the collection in the folder that contains the bruno.json file. You can download the Bruno GUI application here.
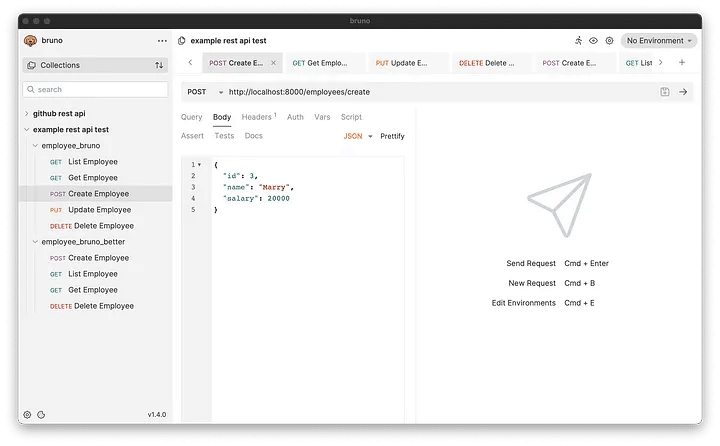
Bruno GUI application
How to Install Bruno (Desktop App and CLI)
The desktop app is available from the download page on the official website, and it can also be installed with each operating system's package manager.
# macOS
brew install bruno

# Windows
winget install Bruno.Bruno
choco install bruno
scoop install bruno

# Linux
sudo apt update && sudo apt install bruno
sudo snap install bruno
flatpak install flathub com.usebruno.Bruno
The command-line tool (the bru command) is installed with npm into a Node.js environment, as in the hands-on section of this article. The GUI and the CLI are installed separately, and you can use either one on its own.
npm install -g @usebruno/cli
GUI vs. CLI: When to Use Which
The GUI is well suited to creating requests and running them one at a time, as well as running them in bulk with the Collection Runner. To open the runner, choose Run from the collection's "···" menu in the sidebar or click the runner icon in the top bar, then set options such as the delay between requests and run it. The runner executes HTTP requests only; gRPC and WebSocket requests are not included.
For automated runs in CI/CD, use the CLI. Running bru run in the collection folder executes all requests in order, and passing a folder name runs only the requests under that folder. Specifying environments and variables, filtering by tags, and outputting reports are also CLI features.
# Run the entire collection
bru run

# Run only the requests under the users folder
bru run users

# Run with an environment (variables can also be overridden)
bru run --env Local
bru run --env Local --env-var JWT_TOKEN=1234

# Filter by tags
bru run --tags=smoke,sanity

# Output reports (several can be specified at once)
bru run --reporter-json results.json --reporter-junit results.xml --reporter-html results.html
From CLI version 3.0.0 onward, the default execution mode has changed to Safe Mode. If your scripts use developer features, specify --sandbox=developer explicitly.
Setting Up Environment Variables and baseUrl
To switch the target between local and production, use environment variables. Environments are stored in the environments folder inside the collection, as one .bru file per environment (.yml for YAML-format collections). For example, local.bru looks like this:
vars {
  host: http://localhost:8787
  token: abc123
}
Requests reference these values with double curly braces, like {{host}}. If you replace the URLs written directly in this article's examples with a variable that plays the role of baseUrl, you can run the same requests against both local and production.
get {
  url: {{host}}/employees/list
}
In the GUI, choose the environment to use from "No environment" in the top right. You can set a default environment on the Presets tab of the collection settings, so the same environment loads automatically no matter who on the team opens the collection. In the CLI, pass the environment name with --env; if you omit it, the default environment is used. Values shared across the entire collection can go in collection variables on the Variables tab of Collection Settings, so you do not have to repeat them in every request.
Treat tokens and API keys as the secret variables mentioned earlier in this article, and keep them out of Git. Committing them written as-is in an environment file is the most common accident.
Collection File Formats (Bru and YAML)
Starting with Bruno 3.0.0, request definitions can be saved in YAML (.yml) in addition to .bru. The YAML format follows the OpenCollection specification defined by Bruno, and the root marker file becomes opencollection.yml instead of bruno.json. Both formats can coexist in the same collection, so you can migrate gradually, and existing .bru collections can be converted to YAML with the official migration guide. The Bru-format examples in this article work as they are.
Team Sharing and Operations with Git
Bruno's strength is that you can collaborate directly with the tools you already use, such as Git, GitHub, GitLab, and Bitbucket. Place your collection in the same repository as your source code, like api_test in this article, or in a repository dedicated to API specifications.
When you create a new collection, a .gitignore is generated automatically that excludes temporary files and caches, environment variable files containing sensitive information, and OS-specific files. It exists to keep you from accidentally committing environment files that contain API keys, so leave it in place.
Team members simply clone the repository and open the folder containing bruno.json (or opencollection.yml) in Bruno. Opening a parent folder detects all the collections beneath it at once, so monorepos work too.
From 3.0.0 onward, the GUI has built-in Git features, and even the free version can initialize a repository, show diffs, and pull. Committing and pushing are Pro or Ultimate features, so with the free version you use git commands in the terminal. Because API changes show up as diffs in .bru files, including collection changes in your pull requests lets you follow the change history of your API specification in the same flow as code review.
This is just the tip of the iceberg; there is much more you can do with Bruno. I hope you enjoyed this blog.
Thank you to Anoop M D and all the maintainers for building Bruno. 🫡
This article is a translation of a piece written by our engineer Mukesh Chaudhary in January 2025.
You can read the original English version here.
https://articles.wesionary.team/bruno-a-better-api-client-for-developers-38b8c7d1d0de
Careers
We are working on systematizing product co-creation. We are looking for product managers to lead product co-creation, and for sales members to bring our vision to the market!
https://wesionary.team/career/product-manager
https://wesionary.team/career/sales
For companies looking for a development partner
By making the most of the advantages of global development, we deliver both high cost-effectiveness and high quality. Our experienced, diverse team takes the time to understand your challenges correctly and delivers the right system and an excellent experience. Whether it is business system development, new business development, or challenges around operational efficiency and digital transformation (DX), please feel free to consult us.